
One of the flashiest features of macOS 15 Sequoia and iOS 18 is iPhone Mirroring, which allows you to use your iPhone in a window on your Mac. You might think, “But I can just pull my iPhone out of my pocket if I need to use it!” While that may be true, not everyone has their iPhone so readily accessible, even if it’s close by.
iPhone Mirroring Benefits
iPhone Mirroring provides a handful of benefits, including:
- Centralized notification management: Once you’ve set up iPhone Mirroring, notifications from your iPhone can also appear on your Mac, ensuring you stay informed while maintaining focus on your work.
- Increased productivity with a keyboard: Typing on a physical keyboard is faster and more efficient than using the iPhone’s virtual keyboard, making iPhone Mirroring a helpful tool for entering and editing lengthy texts.
- Reduced physical distractions: Keeping your iPhone out of sight helps you avoid being distracted by it. With iPhone Mirroring, you can access important apps and notifications without letting the physical iPhone capture your attention.
- Simplified file transfer: Certain apps allow file transfer between the iPhone and Mac using a straightforward drag-and-drop method.
- Access to iPhone-only apps on the Mac: Many apps are available only for iOS, and iPhone Mirroring lets you interact with them directly from your Mac, removing the need to switch devices.
iPhone Mirroring Requirements
A few requirements must be met before you can begin using iPhone Mirroring:
- Your iPhone must have iOS 18 or later, and your Mac needs macOS 15 Sequoia or later.
- Both devices must have Wi-Fi and Bluetooth turned on.
- The devices should be in close proximity and signed into the same Apple Account.
- Handoff must be enabled for the iPhone in Settings > General > AirPlay & Continuity and on the Mac in System Settings > General > AirDrop & Handoff.
Mac App Limitations
Once everything is set up correctly, launch the iPhone Mirroring app on your Mac. A few splash screens explain the basics during the first launch, and afterward, your iPhone will appear in a window. You can move it anywhere you wish and treat it like any other Mac app, with one notable exception—resizing. It does not have a green zoom button, and you cannot resize it by dragging the window edge, but it does offer three size options you can choose from the View menu.

iPhone Hardware Limitations
Using iOS and iPhone apps works pretty much as you’d expect, but there are some limitations. Notably, the iPhone camera and microphone aren’t available, although audio from the iPhone plays through the Mac. Face ID and Touch ID are also not accessible for obvious reasons, which may block access to apps and features protected by biometric authentication. There’s no way to access Notification Center or Control Center, nor to switch apps by swiping the Home indicator—presumably because those three swipes are special due to being at the edge of the iPhone screen. You cannot access the Lock Screen or perform any action that requires a physical button. Finally, you can use only one Continuity feature at a time, so other Continuity features like Universal Clipboard and AirDrop won’t function while you are using iPhone Mirroring.
Core iPhone Interactions
You’ll pick up the basic iPhone interactions quickly. Clicking is like tapping, Control-click acts like touch-and-hold, and swiping on a trackpad behaves like swiping on the iPhone screen. If your Mac has a mouse without swipe gestures instead of a trackpad, click and drag to swipe or use a scroll wheel (hold Shift to scroll horizontally with a scroll wheel). Buttons in the iPhone Mirroring window’s title bar take you back to the Home Screen and open the App Switcher—those actions involve swipes that would be difficult or impossible. Even easier are the keyboard shortcuts in the View menu for Home Screen (Command-1), App Switcher (Command-2), and Spotlight (Command-3).
File Transfer
Although the lack of Universal Clipboard prevents copying between your Mac and a mirrored iPhone, you can transfer files from apps that support it, like Files and Photos. Simply drag and drop between the Mac and the iPhone Mirroring app in either direction. With Files and Photos, it’s usually easier to use iCloud Drive in the Finder and the Mac version of Photos, but other apps may not be as well integrated.
Ending and Restarting Mirroring
Switching back to using the iPhone directly is simple—just unlock it to disconnect from the Mac. When you’re done, lock the iPhone and click the Connect or Resume button to resume.

Dealing with Multiple Macs and iPhones
Connecting an iPhone to multiple Macs is not an issue, although only one can use it at a time. To remove access for a Mac, use the iPhone to navigate to Settings > General > AirPlay & Continuity > iPhone Mirroring, tap Edit, and then tap the red delete button. If you have more than one iPhone available for iPhone Mirroring, you can select which one to use in System Settings > Desktop & Dock, just below the “Use iPhone widgets” setting—the menu appears only when the Mac detects multiple iPhones nearby.
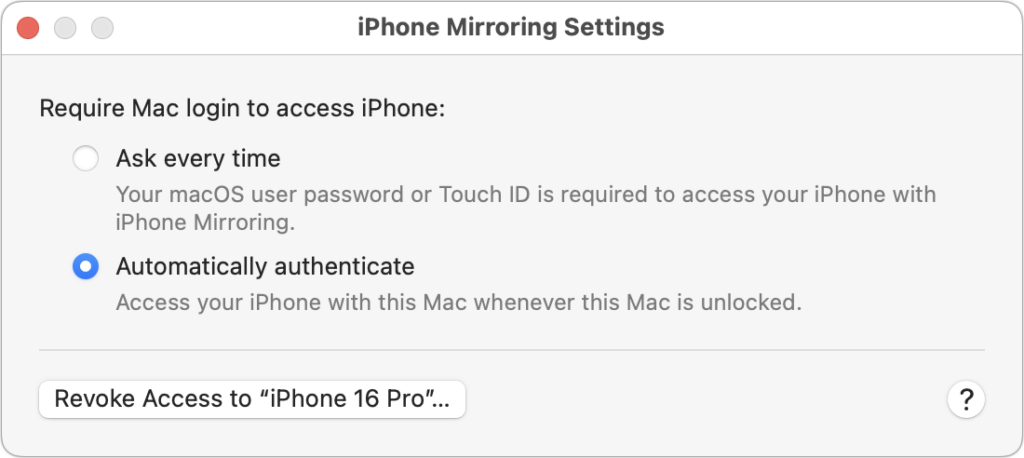
On final note. In iPhone Mirroring > Settings, you can choose whether to require your Mac login for every connection or to authenticate automatically. Set it to “Ask every time” if your Mac is shared with others, if others know your Mac password, or if you want to enhance protection against potential malicious software. It’s more secure but slightly more inconvenient.
In the end, if you frequently find yourself reaching for your iPhone while working on your Mac or wish it were more accessible, try iPhone Mirroring. It’s an easy, effective way to work between the devices and reduce unnecessary interruptions.
(Featured image by iStock.com/Diego Antonio Maravilla Ruano)